
Using Nest Payroll
Timesheets and pay stubs, step by step
Employees enter their hours. Employers review the pay stub, make any corrections, and approve payroll.
Screens show Nest Payroll in a mobile web browser.
Before you start
The employer adds the employee and connects their employee account. The employee signs in with their own account and accepts the invitation. Check the pay rate, employment start date and workweek before entering hours.
Set up sick time and vacation separately if you offer them. The available time-off fields follow the employee’s settings.
- 1. Enter hoursThe employee records each day.
- 2. SubmitThe hours go to the employer.
- 3. ReviewThe employer checks the pay stub.
- 4. ApproveThe employer approves and continues to payment.
For employees: enter and submit hours
Start on Home → choose your employer → open or create a timesheet.
Choose the right week
Check the dates at the top. Choose an earlier week if needed. If you see several timesheets, open the one you mean to continue. Choose Create Another Timesheet only when you need a separate submission; don’t enter the same hours twice.
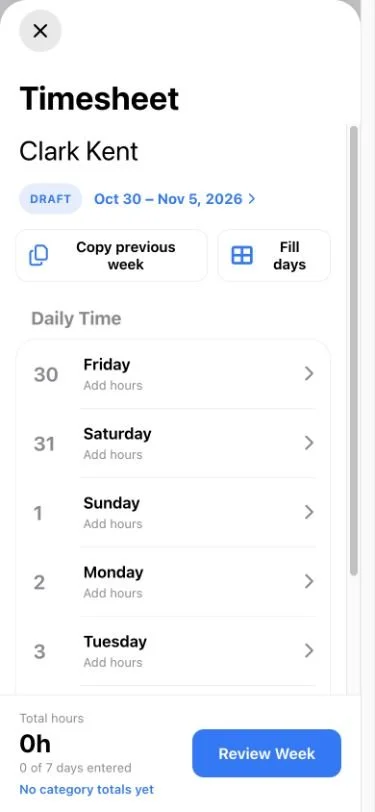
Check the week before entering hours. Enter each day
Open a day and enter hours and minutes in the appropriate categories: regular time, overtime, doubletime, sick time or vacation (shown as PTO). When space is limited, More time opens the additional categories. Add a short note if the employer needs an explanation.
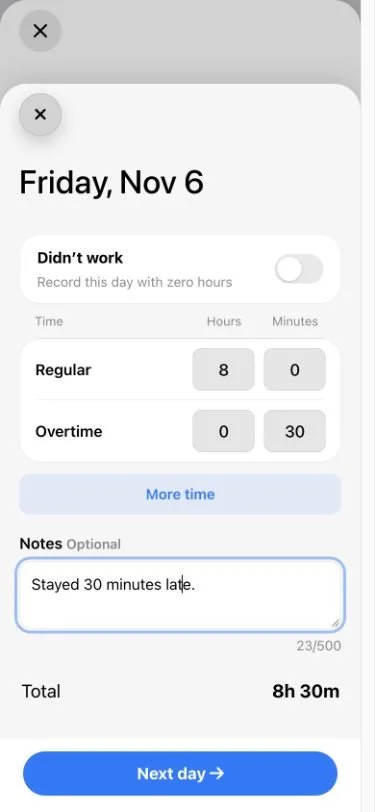
Enter hours and minutes, add a note, then choose Next day. Confirm days without work
Choose Didn’t work for a day with no worked or paid-leave hours. This is different from leaving the day unfinished. Use Next day to save and continue.
Review the whole week
Choose Review Week. Check every day, the category totals and the dates. Complete any days still awaiting hours or a Didn’t work confirmation.
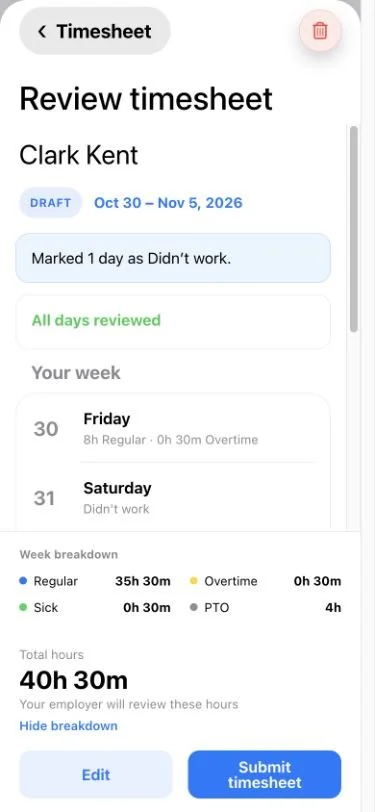
Review every day and expand the category totals before submitting. Submit the timesheet
Choose Submit timesheet and confirm. Your employer receives the hours for review. Submitting does not approve payroll or send your wages.
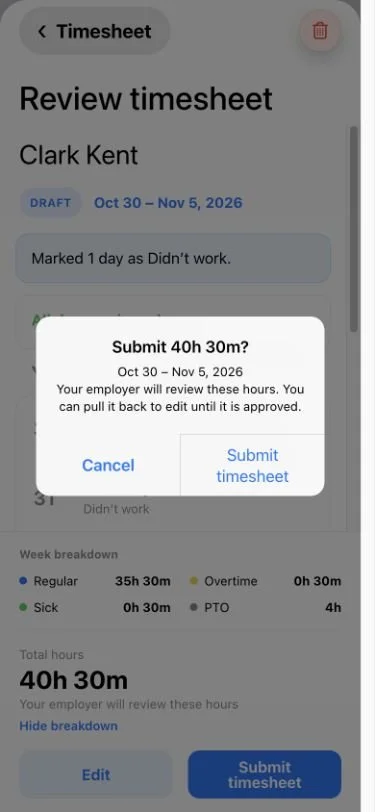
Confirm the dates and hours. The employer reviews the submission next.
See your employer’s changes
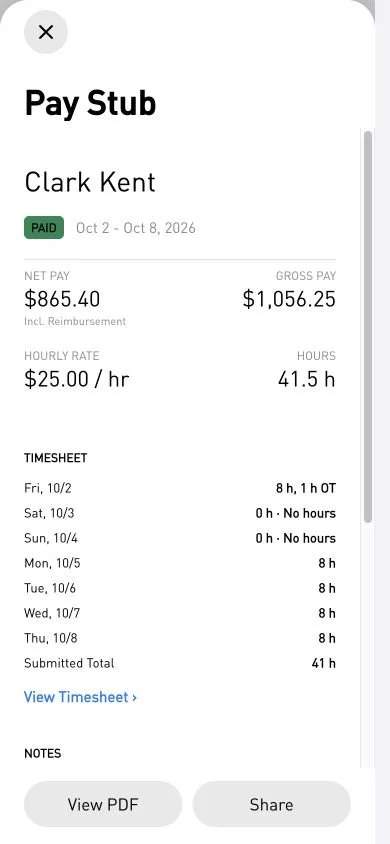
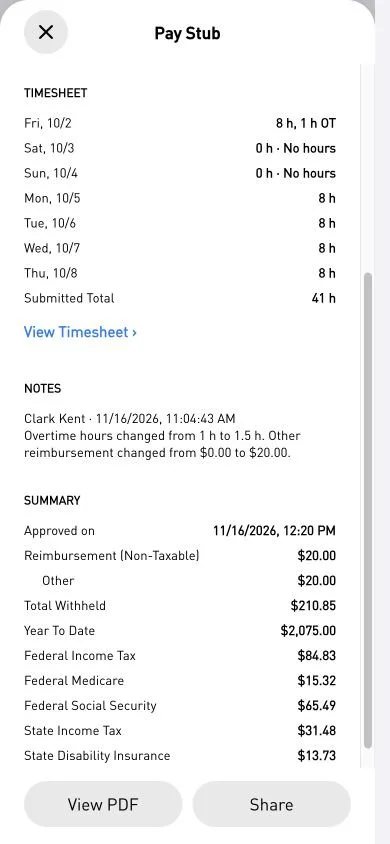
After your employer approves payroll, open Recent Paystubs from Home and choose the pay stub. You’ll see the updated pay and hours. Scroll to Notes to see what your employer changed. Your submitted timesheet keeps the hours you originally sent.
In this example, the employer added half an hour of overtime and a $20 reimbursement. You see 41.5 hours and $865.40 net pay, including reimbursement. Notes explains both changes. Ask your employer if you have a question about an adjustment.
Speed up entry with Copy previous week or Fill days
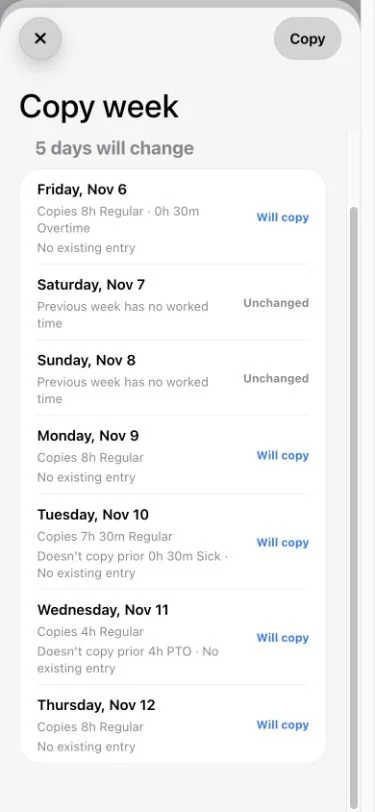
Copy previous week lets you preview worked hours before copying them into eligible days. It does not copy last week’s sick time, vacation or Didn’t work confirmations. Check what will change before applying it.
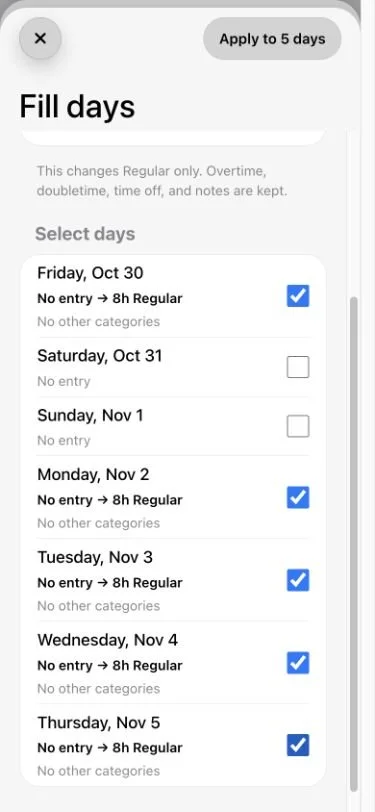
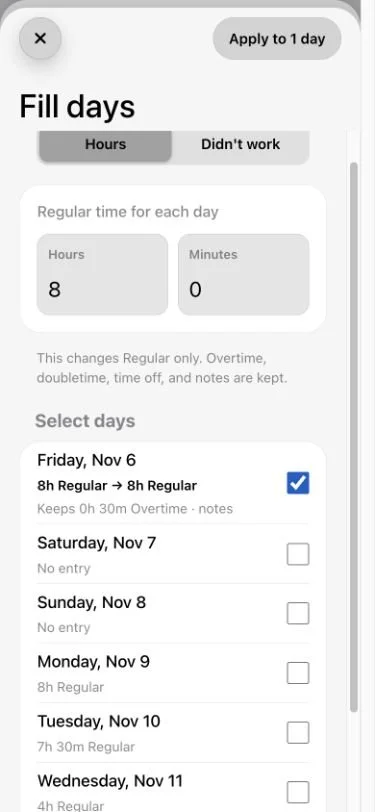
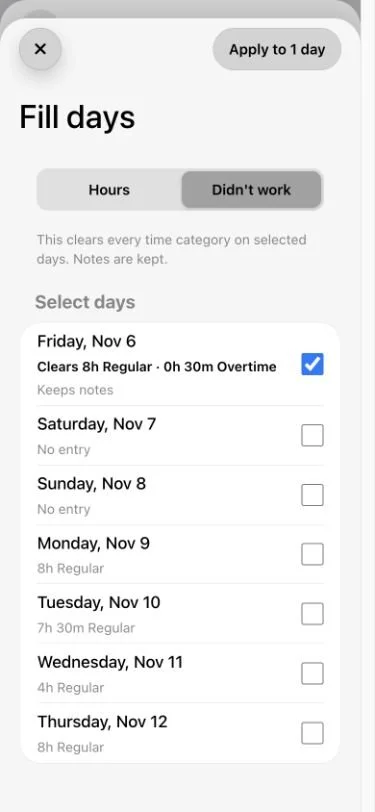
Fill days lets you enter the same regular hours on selected days, or mark selected days Didn’t work. Filling regular time keeps other categories and notes. Marking days Didn’t work clears their time categories, so review the selection first.
Change hours after submitting
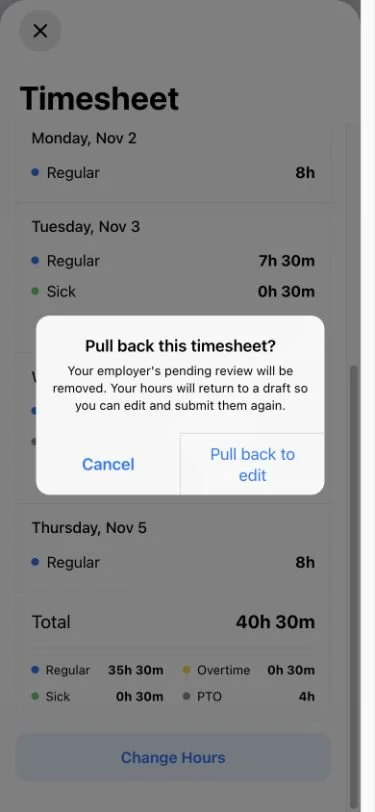
While the timesheet is awaiting approval, choose Change Hours where available and confirm. It goes back to a draft, and the pending pay stub is removed. Correct the hours, review the week and submit again.
Fix a returned timesheet
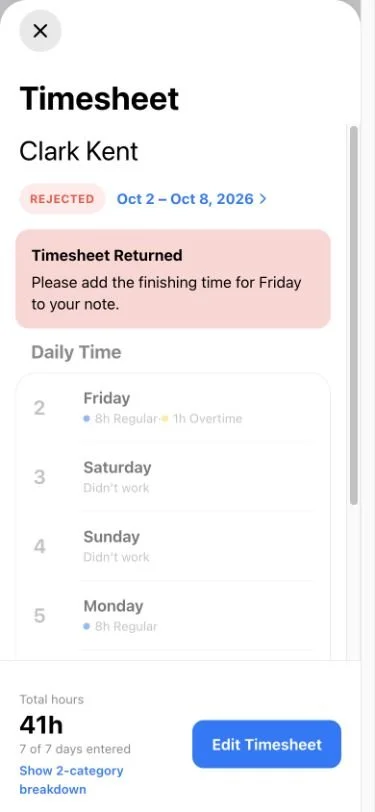
Open the returned timesheet and read the employer’s note. Choose Edit Timesheet, correct the entries and submit again. Some detail screens label returned timesheets Rejected.
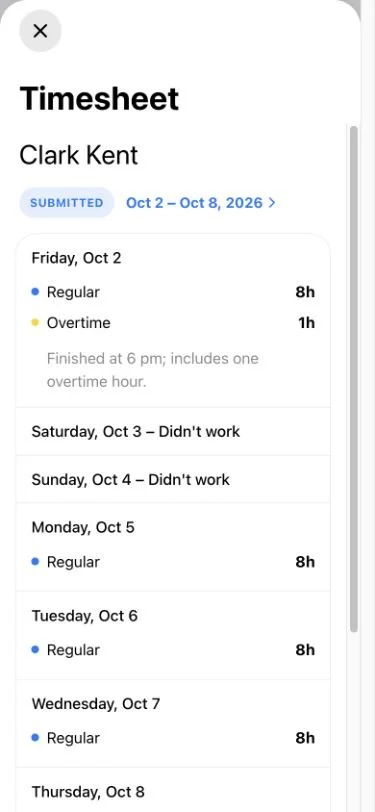
Add hours after a timesheet is approved
An approved timesheet is locked. If you need to report additional hours, use the additional-hours option where available. Enter only the extra hours in the separate timesheet; do not copy the hours already approved. Check with your employer first.
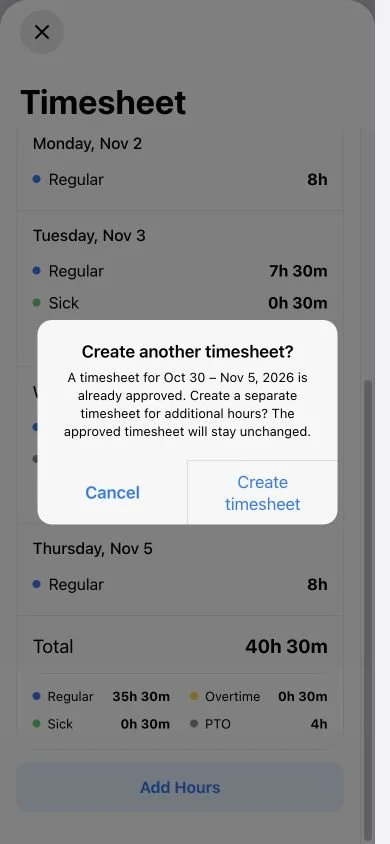
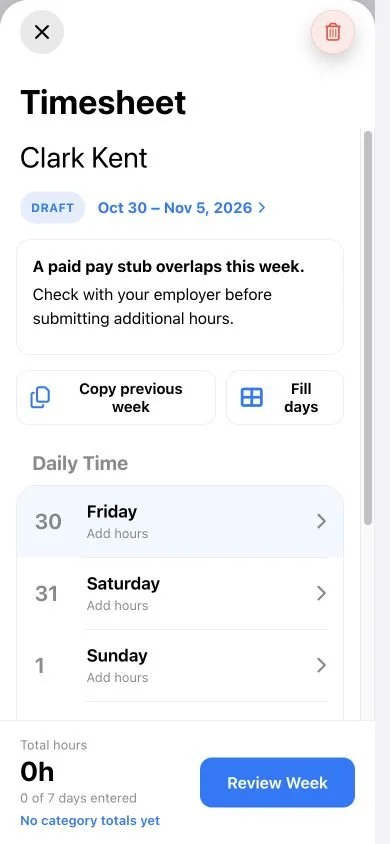
Report a week with no work, or remove an unused draft
If every eligible day has zero worked and paid-leave hours, review and submit the week as No Work. The employer still reviews it. An unused draft can be deleted from the review screen; check the dates before confirming.
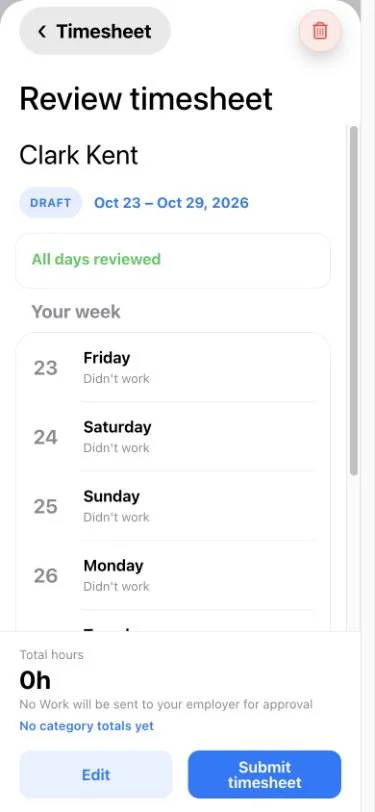
For employers: review, correct and approve
Paystubs → In Review → open the employee’s pay stub.
Open the pay stub in review
When your employee submits a timesheet, their pay stub appears under In Review. Open it and check the employee and pay period. The pay stub includes their submitted hours and a View Timesheet link.
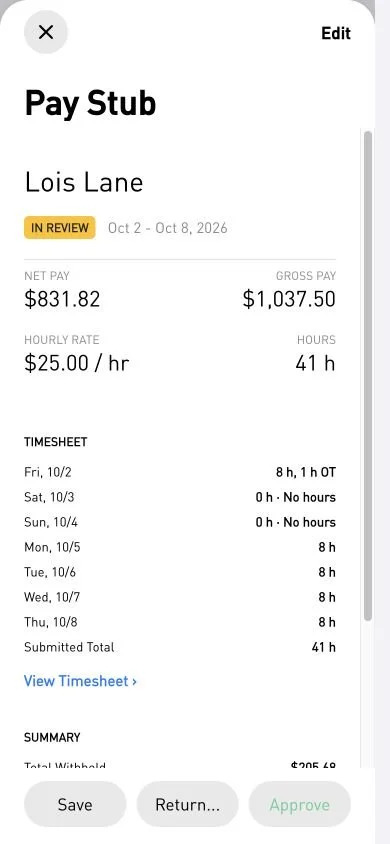
Open the In Review pay stub, then choose View Timesheet. Review the timesheet and pay
Choose View Timesheet to review the daily entries, time-off categories and employee’s notes. Then check the pay stub’s hours, rate, reimbursements, deductions, gross pay and net pay.
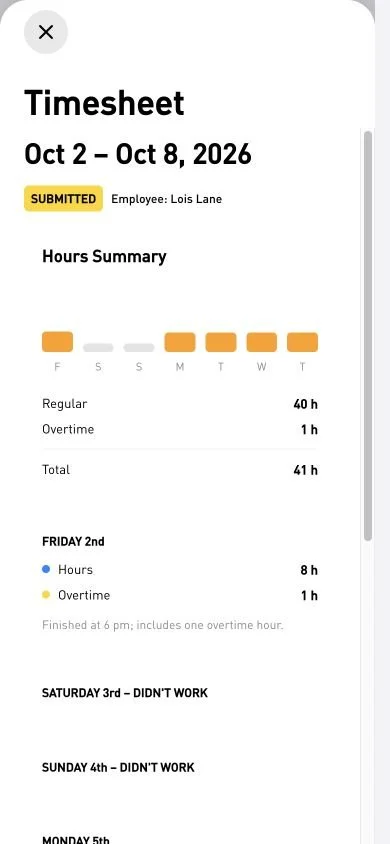
Review each day and the employee’s notes before deciding what to do. Make changes yourself, or return it
Choose Edit on the pay stub to change regular, overtime or doubletime hours, adjust paid time off, or add a bonus or reimbursement. Save and check the recalculated pay and any warning. Nest Payroll records your changes in Notes; the employee’s submitted daily timesheet stays unchanged.
Or choose Return to employee or Return… and explain what needs fixing. The employee receives your note, corrects their timesheet and submits it again. The draft pay stub is removed until they resubmit.
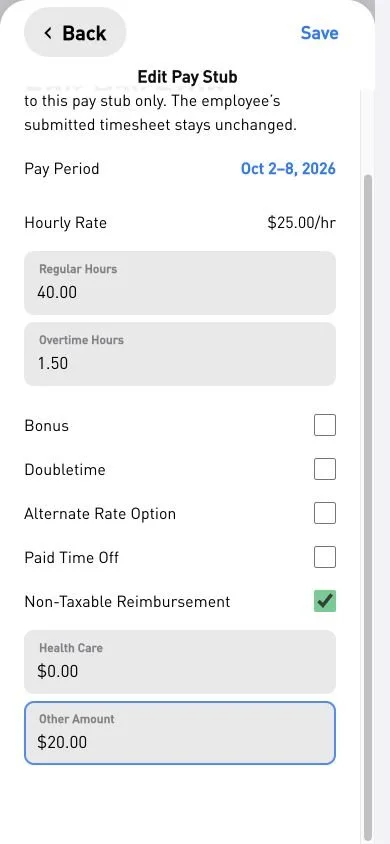
This example changes overtime to 1.5 hours and adds a $20 reimbursement. After the employer’s update
Here the employer added half an hour of overtime and a $20 reimbursement. The pay stub now shows 41.5 hours and $865.40 net pay, including reimbursement. The employee’s submitted timesheet still shows 41 hours. Notes records exactly what changed.
See what the employee sees after approval →
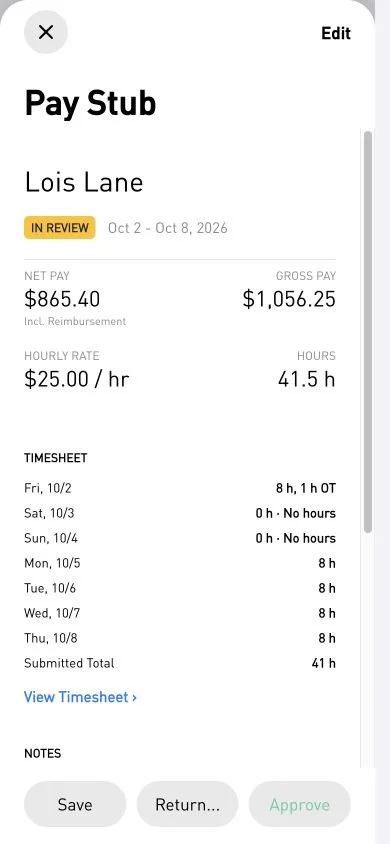
The updated pay stub shows the new hours and recalculated pay. 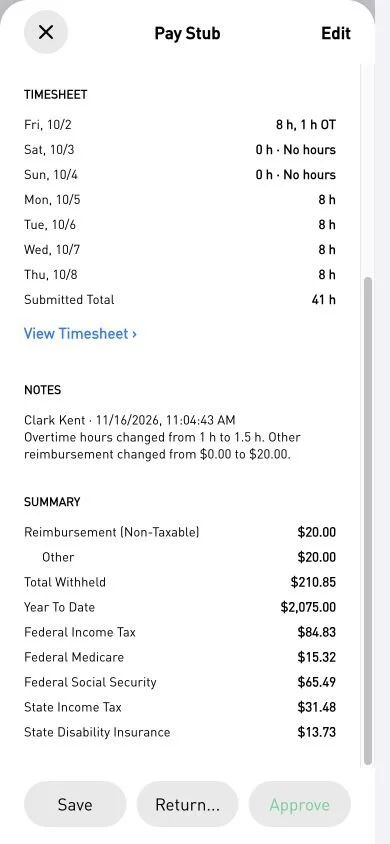
Notes shows the overtime change and the $20 reimbursement. Approve when everything is right
Choose Approve from the pay stub, or Approve & Pay from the timesheet where shown. Check the final confirmation. Approving the linked pay stub also approves the timesheet.
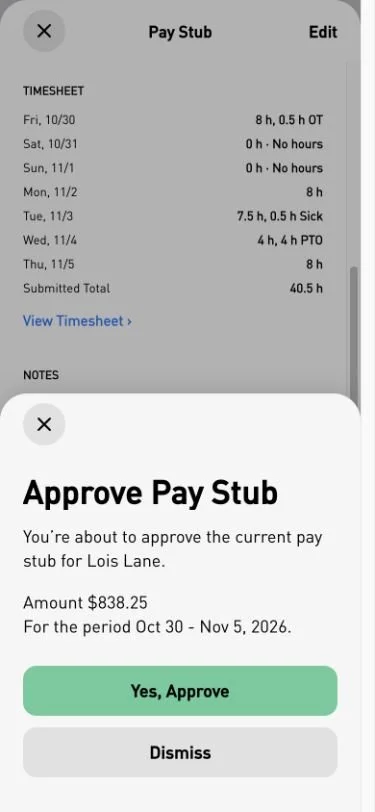
Check the final amount and period, then confirm approval. Complete payment and keep the pay stub
After approval, a pay stub with wages shows Paid and payment choices open. Use your chosen method to send the wages; the label alone does not confirm that money reached the employee. The approved pay stub appears automatically in the employee’s account and is emailed to them by default, based on the email setting in their employee profile. You can also use View PDF, Email or Share to view or send another copy.
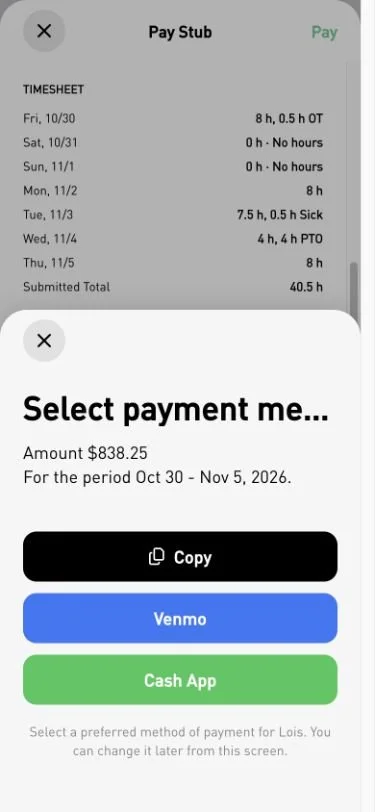
Choose how to send wages after approving payroll.
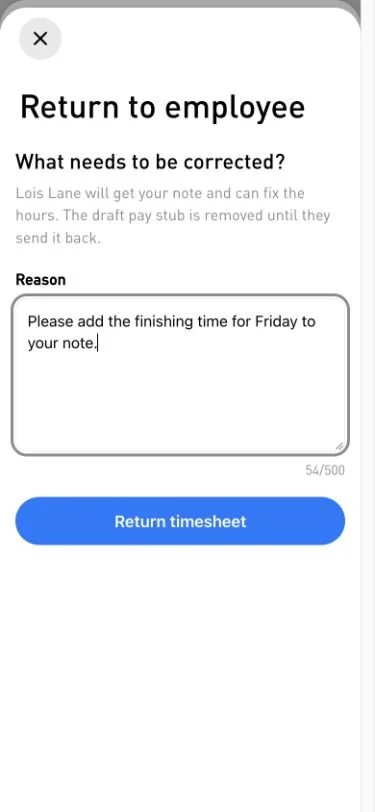
Approve a No Work week
Open the No Work submission, check the dates and confirm Approve No Work. No payment is due for a week with no worked or paid-leave hours.
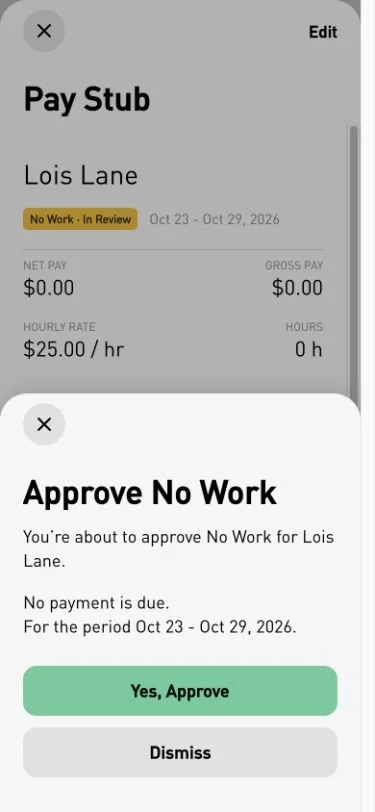
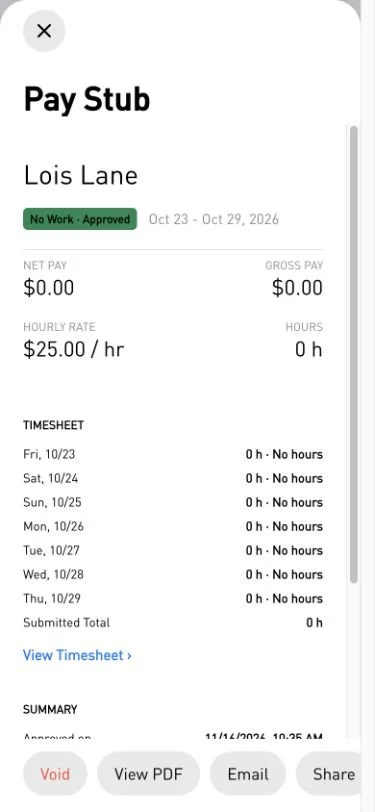
Return a timesheet for correction
Explain what needs fixing. The employee receives your note, corrects their timesheet and submits it again.
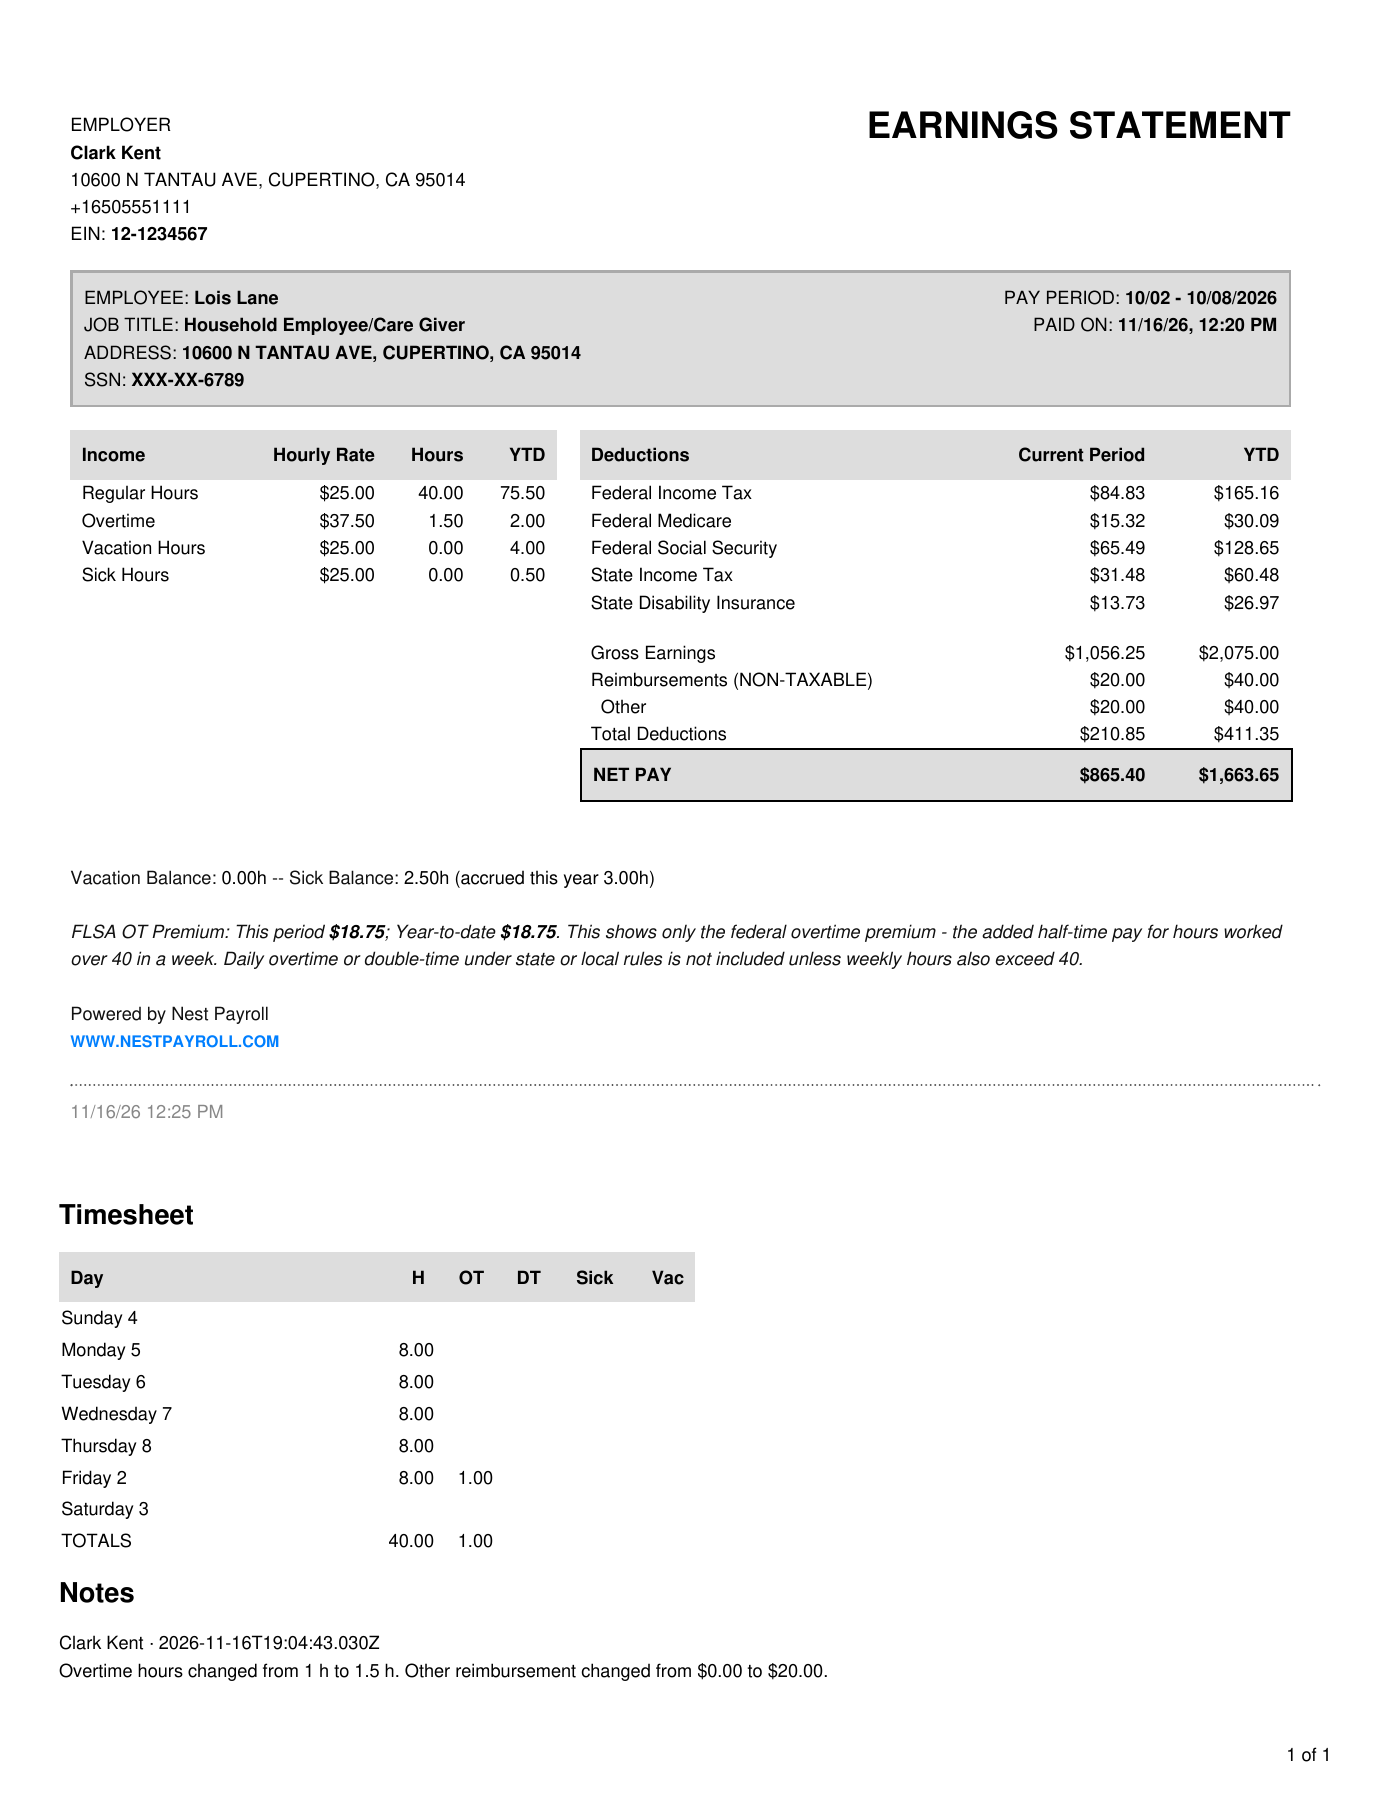
See a sample pay stub PDF
This PDF from our example accounts shows the updated earnings, submitted timesheet and the employer’s change note.
Common questions
Why do the timesheet and pay stub show different hours?
The timesheet shows the employee’s submitted daily entries. An employer can adjust the pay stub without rewriting those entries. Check Notes for the payroll changes.
Can I edit an approved timesheet or pay stub?
Approved timesheets and finalized pay-stub figures are locked. Do not submit the same hours again to replace them. Ask your employer or Nest Payroll support how to correct an approved payroll record.
What do the timesheet statuses mean?
- Draft
- The employee is still entering or correcting hours.
- Submitted
- The employer has the hours for review.
- Returned
- The employer has asked the employee to correct and resubmit.
- Approved
- The employer has approved the linked payroll. This is separate from payment settlement.
Why can’t I submit or approve?
Check that you chose the right account, employee and week. Finish any unconfirmed days, read the message on screen, and reload if the record has changed. The employer also needs an active subscription for payroll actions. Contact support if the issue remains.
Where can employees find their pay stubs?
Open Recent Paystubs from Home and choose a record. You can view the approved pay stub, read payroll adjustment Notes, open View PDF or use Share. See the employee example and sample PDF.
Does copying or filling hours submit them?
No. Review the resulting week and choose Submit timesheet when it is ready. Be careful not to create a second submission for hours already sent or approved.